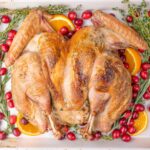
This spatchcock turkey recipe is the most delicious way to bake a whole turkey. First, it’s dry-brined then covered with flavorful herb orange butter and baked flat on a baking sheet. It bakes really quickly and the meat comes out tender and juicy. You’ve got to try this baking method – once you try it, you may never go back!
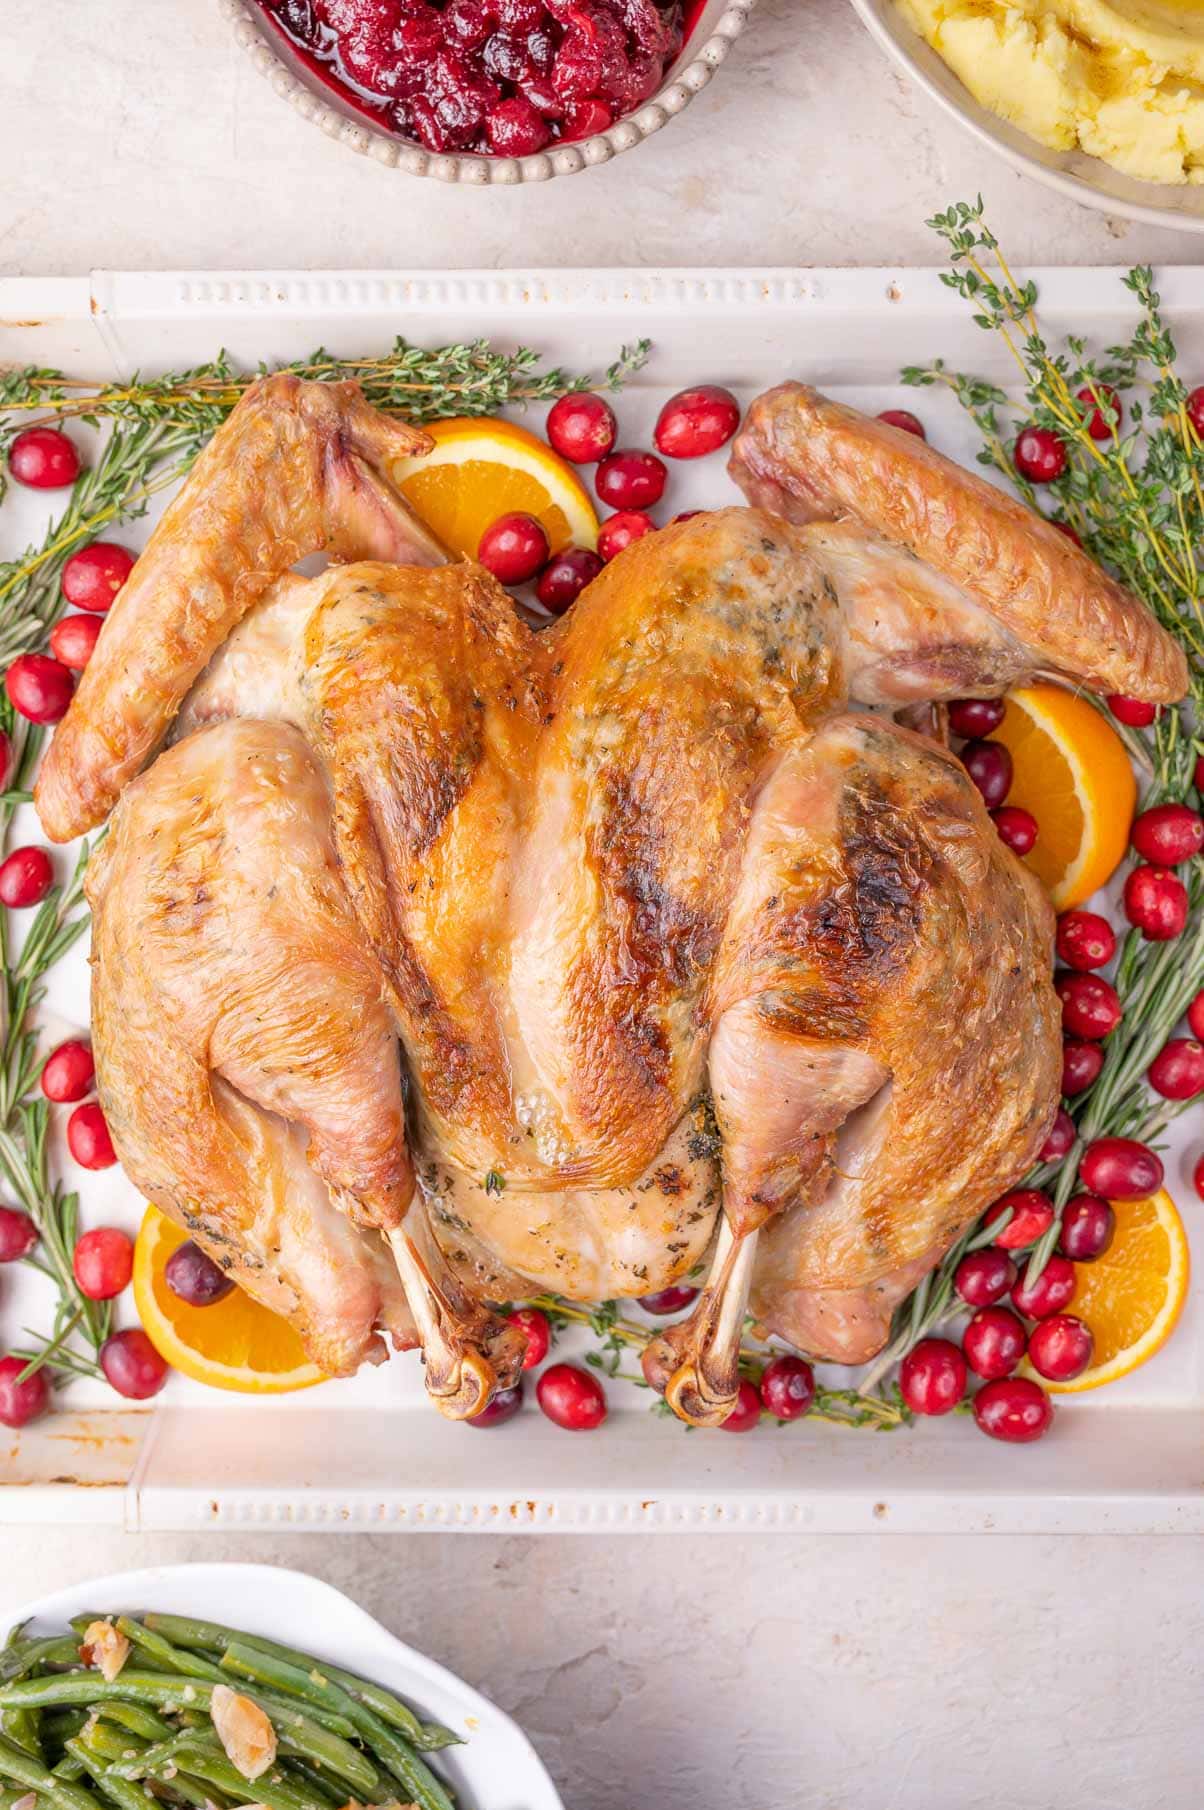
Ingredients
Here’s what you need to make this amazing roast turkey:
- turkey – any size will work – I tested this recipe with a 7 1/2 lbs (3.4kg), 11 lbs (5kg), and 18 lbs (8kg) turkey and it worked well in all cases
- butter – for flavorful herb orange butter to put under the turkey skin
- orange zest – this is a very important ingredient – don’t omit it – it adds an amazing flavor and works perfectly with turkey meat flavor
- fresh garlic
- fresh herbs – thyme, rosemary, and sage are the perfect herbs for turkey, you can also use just thyme and rosemary
- salt and pepper
For the turkey broth, you will need backbone, wishbone, neck, and wing tips from the turkey, plus a couple of herbs and vegetables. You can also just use store-bought chicken broth if you don’t want to make turkey broth but it really takes just 5 minutes to prepare and tastes much better.
For the turkey gravy, you will need pan drippings, turkey broth (or chicken broth), dry white wine (you can swap it for broth if you’re not cooking with wine but it adds flavor and acidity to the sauce so you may also need to add a small amount of vinegar to the gravy), Worcestershire sauce (adds great flavor), flour (to thicken the gravy).
How to spatchcock turkey
What is spatchcock turkey?
A spatchcock turkey, also called a butterflied turkey is a whole turkey with its backbone removed and baked flat on a baking sheet.
Why do you spatchcock turkey?
Spatchcock turkey bakes more evenly and you can avoid overbaking turkey breast which happens often when roasting a whole turkey the traditional way. Another advantage is that the bird cooks really quickly – an 18 lbs (8kg) bird will be ready in 2 hours and an 11 lbs (5kg) turkey will cook in about 1 1/2 hours – how great is that?
How to spatchcock turkey:
Before you start:
- Make sure your turkey is completely thawed.
- Remove the bag with neck and giblets from the turkey cavity – you can reserve them for the broth.
- Clean the turkey with wet paper towels then pat it dry with dry paper towels.
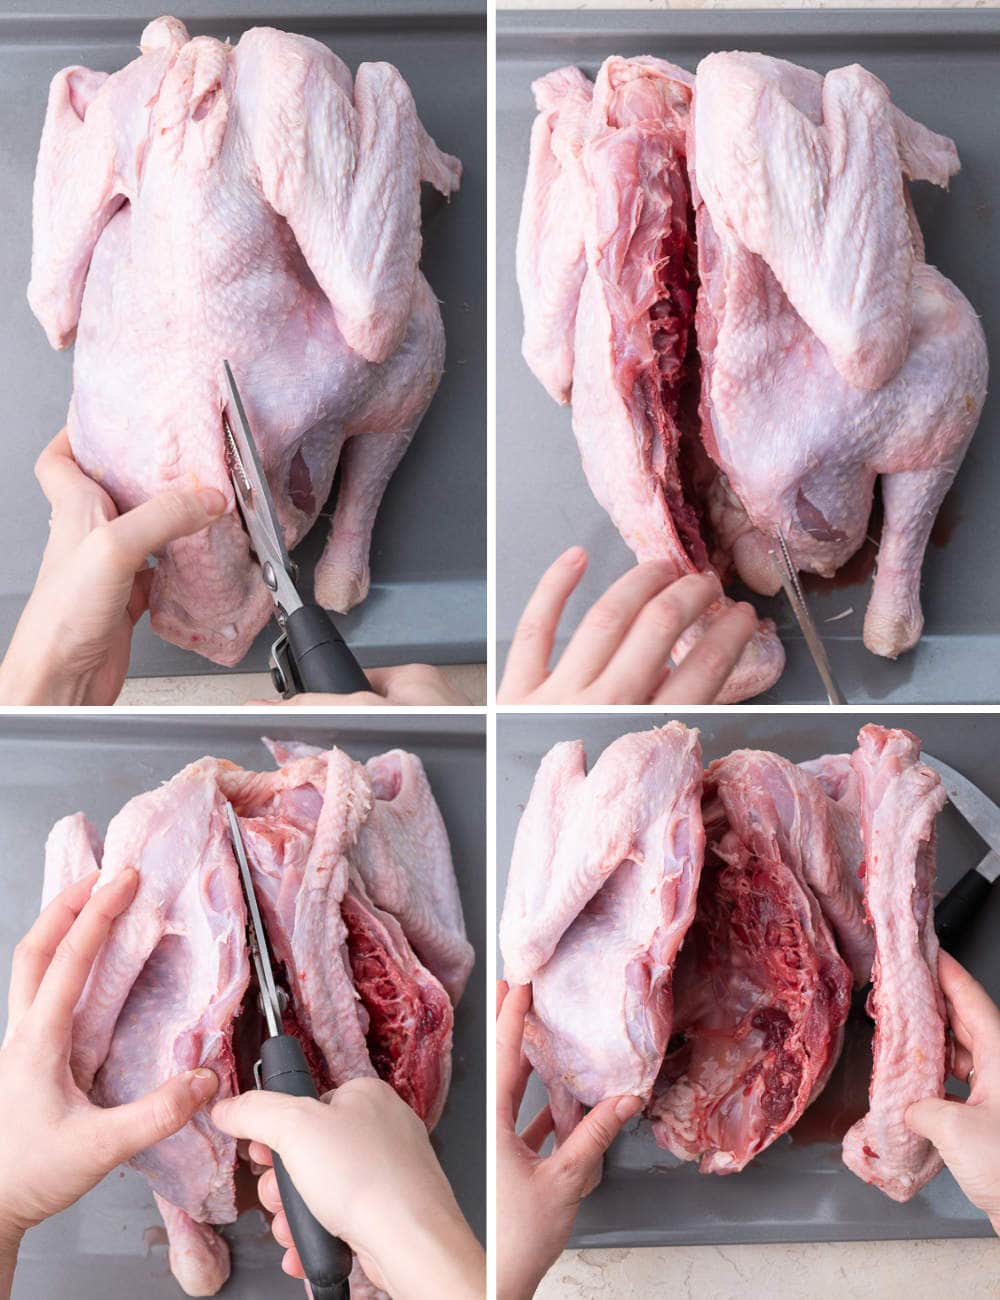
STEP 1: Remove the backbone
Place the turkey on a large rimmed baking sheet breast side-down. Localize the backbone of the turkey. Using poultry shears remove the backbone (cut along one side of the backbone, from the tail to the neck, and repeat on the other side).
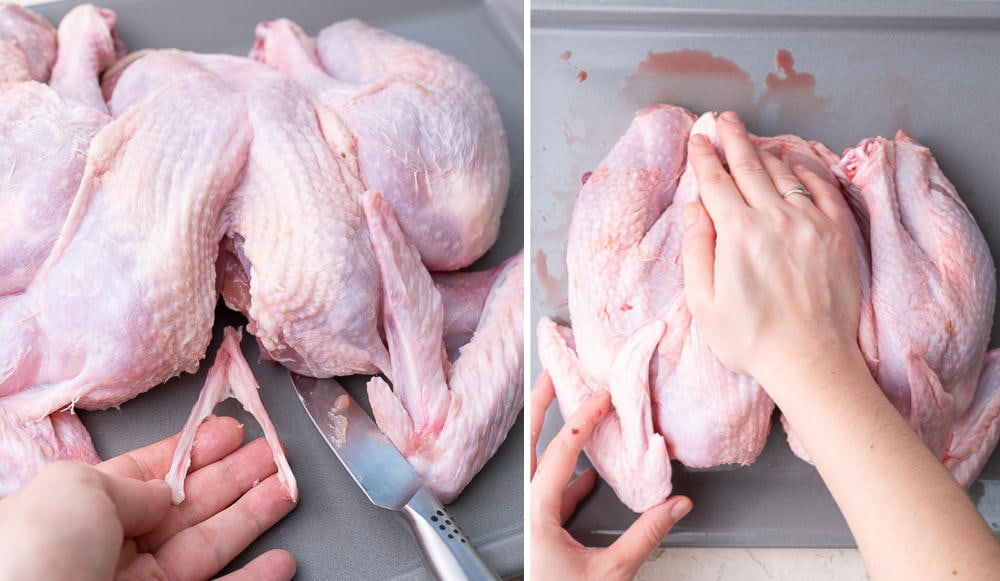
STEP 2: Remove the wishbone – Using a small pairing knife, remove the wishbone – it’s a small, V-shaped bone that can be found at the top of the breasts.
Cut off the tips of the wings if they’re still attached. Reserve the backbone, wishbone, and wing tips for the gravy.
STEP 3: Flatten the turkey: Turn the turkey breast side up. Firmly press down on the turkey breast until it lays flat on the baking sheet (you need to crack the bones).
NOTE ON THE TURKEY SIZE: If you have a very large bird: Spatchcocking the turkey is really easy when handling small or medium-sized birds. When trying this recipe with an 18 pound (8kg) turkey, I’ve found cutting the backbone at the tail side be very difficult. Although I have good-quality poultry shears I couldn’t cut through the bones around the tail – they were simply too thick. I ended up cutting through the joint between the backbone and the legs so I removed a little bit more of the bone/tail part of the turkey. I also had a problem with cracking the breast bones so that the breasts lay flat on the baking sheet, so I just cut through the ribs close to the sternum of the bird. Although it was a little bit problematic to prepare a large turkey using this method, it all worked out really well, the turkey came out amazing and I would still recommend this method for a large turkey, just be prepared that it may not be that easy.
Dry brining turkey
What is the point of brining?
The salt breaks down some of the turkey’s proteins, making the meat more tender. Brining a turkey also adds moisture to the meat.
What is dry-brining?
There are two methods of brining meat: wet-brining in a water-salt solution and dry brining which means rubbing the meat with salt and letting the meat rest in the refrigerator before cooking it.
How to dry-brine turkey:
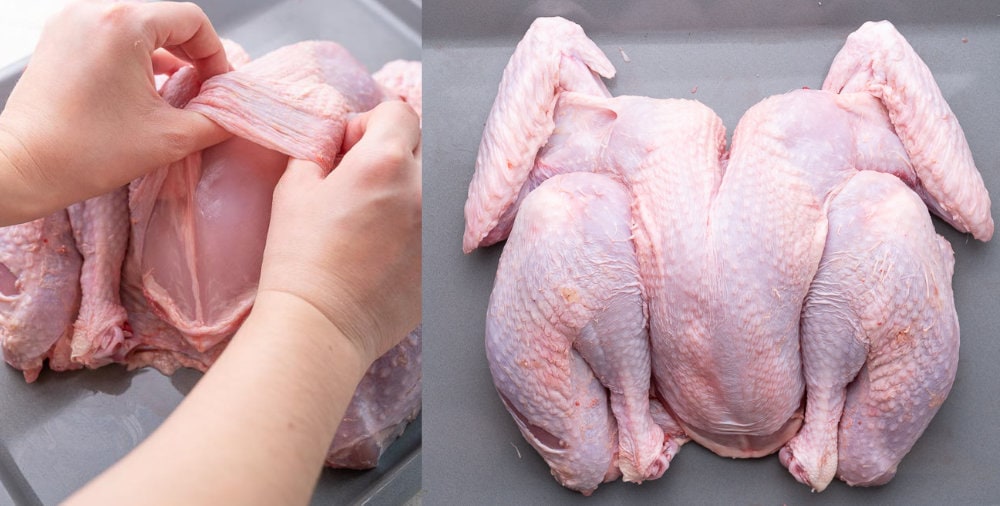
STEP 4: Detach the skin from the breasts and legs (be careful not to tear it).
STEP 5: Rub the turkey all over with salt, especially under the loosened skin.
STEP 6: Wrap the turkey and baking tray with plastic foil and place in the fridge. Leave the turkey to dry brine for 2 days.
The salt amount: adjust the amount of salt to the weight of the turkey. I’ve used 1 1/2 Tbsp of table salt for a 7 1/2 pound (3,4 kg) turkey and 3 1/3 Tbsp for a 18 lbs (8kg) turkey.
Make turkey broth
We will use this turkey broth for the gravy. It’s really so easy to make and you already have the leftover turkey pieces to make it so it’s really no point in buying chicken broth for the gravy! Basically, you will add all the ingredients into a pot, cover with water and cook for about 2 hours. The longer you cook the broth the more concentrated and better tasting it will be. You can make this in advance so you’ll have everything ready when it’s time to cook the turkey.
STEP 7: Add the reserved turkey neck, giblets (I’m only using the heart because I don’t like the others, but use them if you don’t mind their strong flavor), wing tips (if you have them), wishbone, and cut into smaller pieces backbone into a large pot.
Peel the carrot and onion. Chop carrot, onion, celery into large chunks. Add them to the pot. Add the garlic (can be unpeeled), mushrooms, herbs, and spices to the pot. I’m not adding any salt.
Add enough water to cover the ingredients. Bring to a boil then simmer over very low heat for about 2 hours.
Strain the liquid through a fine-mesh strainer, cool down, and put in the fridge. It will turn into jelly when cold and this is normal. You can discard all the vegetables and bones.
How to quickly cool a pot with hot broth: fill your sink with cold water and place the pot in the water. Change the water every 20 minutes until the pot is cold.
Baking spatchcock turkey
Take the turkey out of the fridge 1 hour before you plan on baking it (it will bake more evenly when it’s not completely cold).
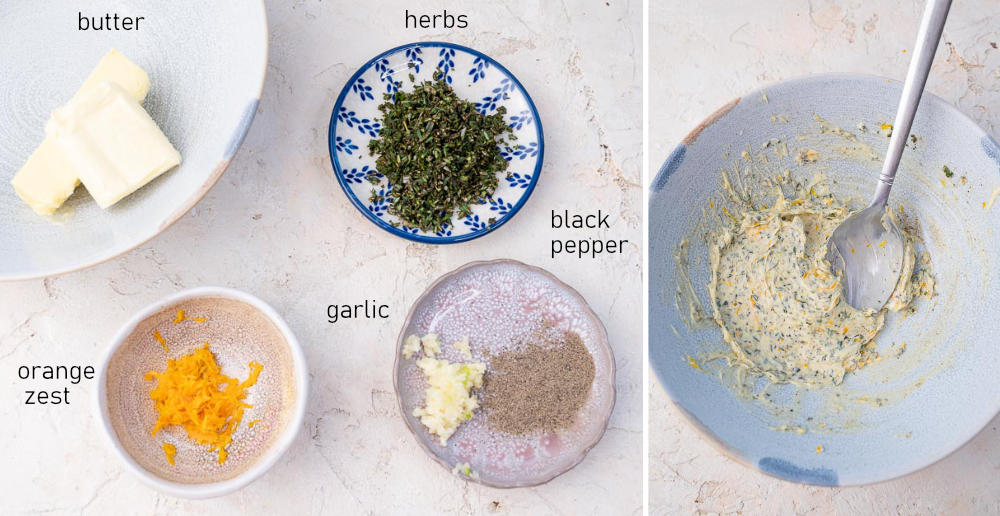
STEP 8: Make herb orange butter
Make the orange herb butter: combine soft butter with finely chopped herbs, grated orange zest, minces cloves garlic, and black pepper (I’m not adding any salt).
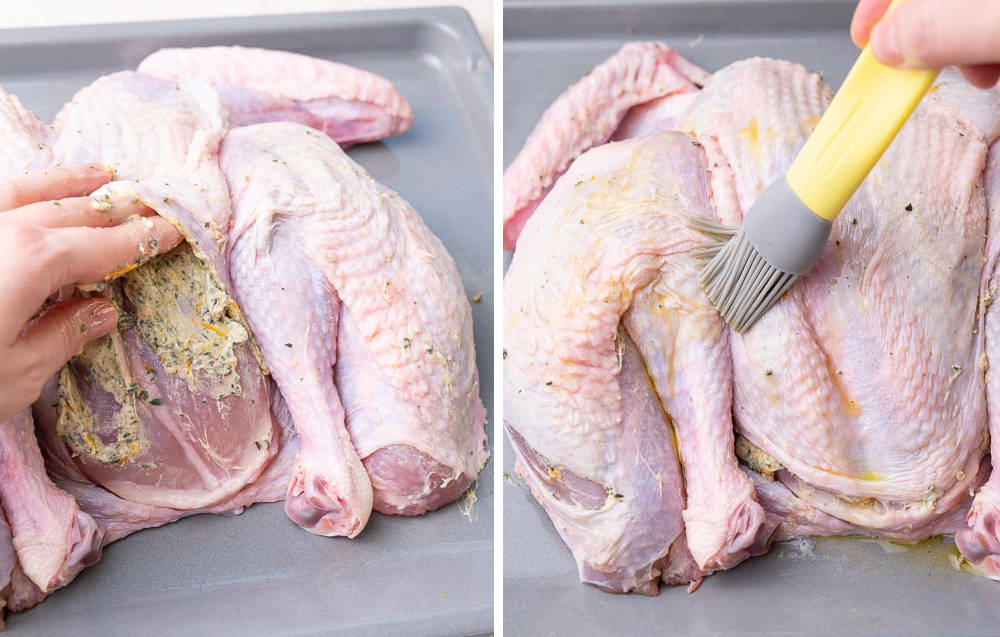
STEP 9: Spread the butter everywhere under the skin. Do not spread it on top of the skin – the herbs would burn in a hot oven.
You don’t have to spread butter under the turkey because it will melt and gather at the bottom of the baking sheet anyway. You also don’t need to baste the meat, it will “baste itself” with slowly melting butter.
STEP 10: Brush the skin with olive oil.
Spread the turkey as flat as possible on the baking tray. For a large turkey, you can spread the legs more to the sides instead of tucking them close to the breasts.
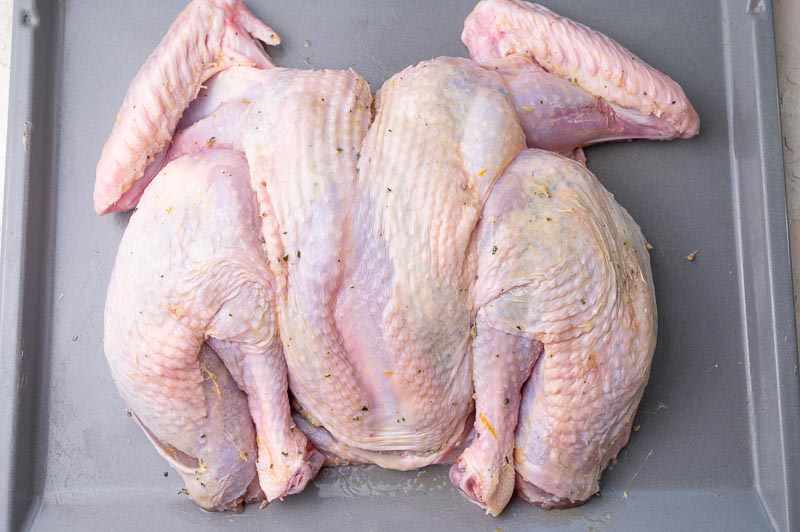
STEP 11: Bake the turkey:
Preheat the oven to 400°F (200°C).
When the oven is hot, place the baking sheet in the oven and bake the turkey until the skin is golden brown and the turkey is cooked through.
How to check if the turkey is cooked through:
To check if the turkey is cooked through, measure the temperature of the meat with a thermometer. To measure the temperature correctly, insert the probe into the deepest part of the breast, being careful to not go so deep as to hit the bone. Confirm the temperature in both sides of the breast. It should reach 165°F (74°C) for the breast and between 170-175°F (77-80°C) for the thigh. I’m actually taking the meat out of the oven when the breast reaches 158°F (70-71°C) and it comes to a safe temperature while resting. You need to be careful to not overcook the breast meat (it will be dry) but you don’t have to worry about the thighs – they actually are better when cooked longer.
I baked my 11 lbs (5kg) turkey for 1 hour and 20 minutes.
I baked a small 7 1/2 pound (3.4 kg) turkey for 45 minutes until the breast was at 145°F (63°C) then I turned on the fan+grill setting to brown the skin (you can also move the turkey one rack higher and turn on the burner) and baked the turkey until the breast has reached 158°F (70-71°C) – about 5-10 minutes.
A large turkey – 18 lbs (8kg): I baked it for 1 hour and 20 minutes at 400°F (200°C) then I reduced the temperature to 325°F (160°C) (otherwise it would burn) and baked it for 40 more minutes (2 hours in total).
Visual signs of a turkey that is done:
- breast meat will be white but a leg meat can be a little pink in color – just check the temperature of the meat and then you can be sure it’s safe to eat
- if you cut through the meat – the juices should be clear and not pink
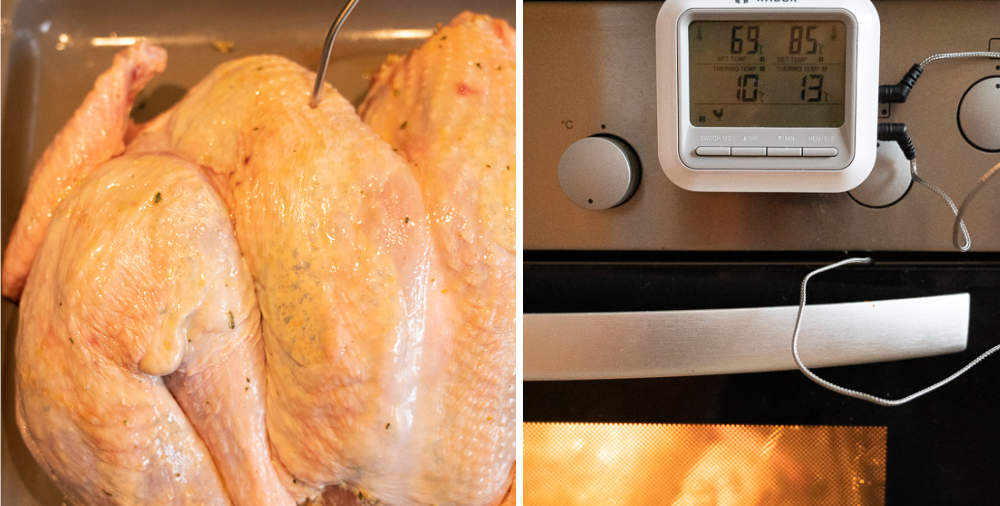
You can use an instant-read thermometer or a grill thermometer to measure the temperature. I especially recommend a grill thermometer – you insert the probe into the meat and it stays there for the whole baking time. The thin wire goes through the door of the oven and the thermometer stays outside.
You can set your thermometer to the desired temperature and when your turkey reaches it, the timer will let you know that your turkey is ready. This way you don’t have to check on the turkey and open the oven door which decreases the temperature of the oven.
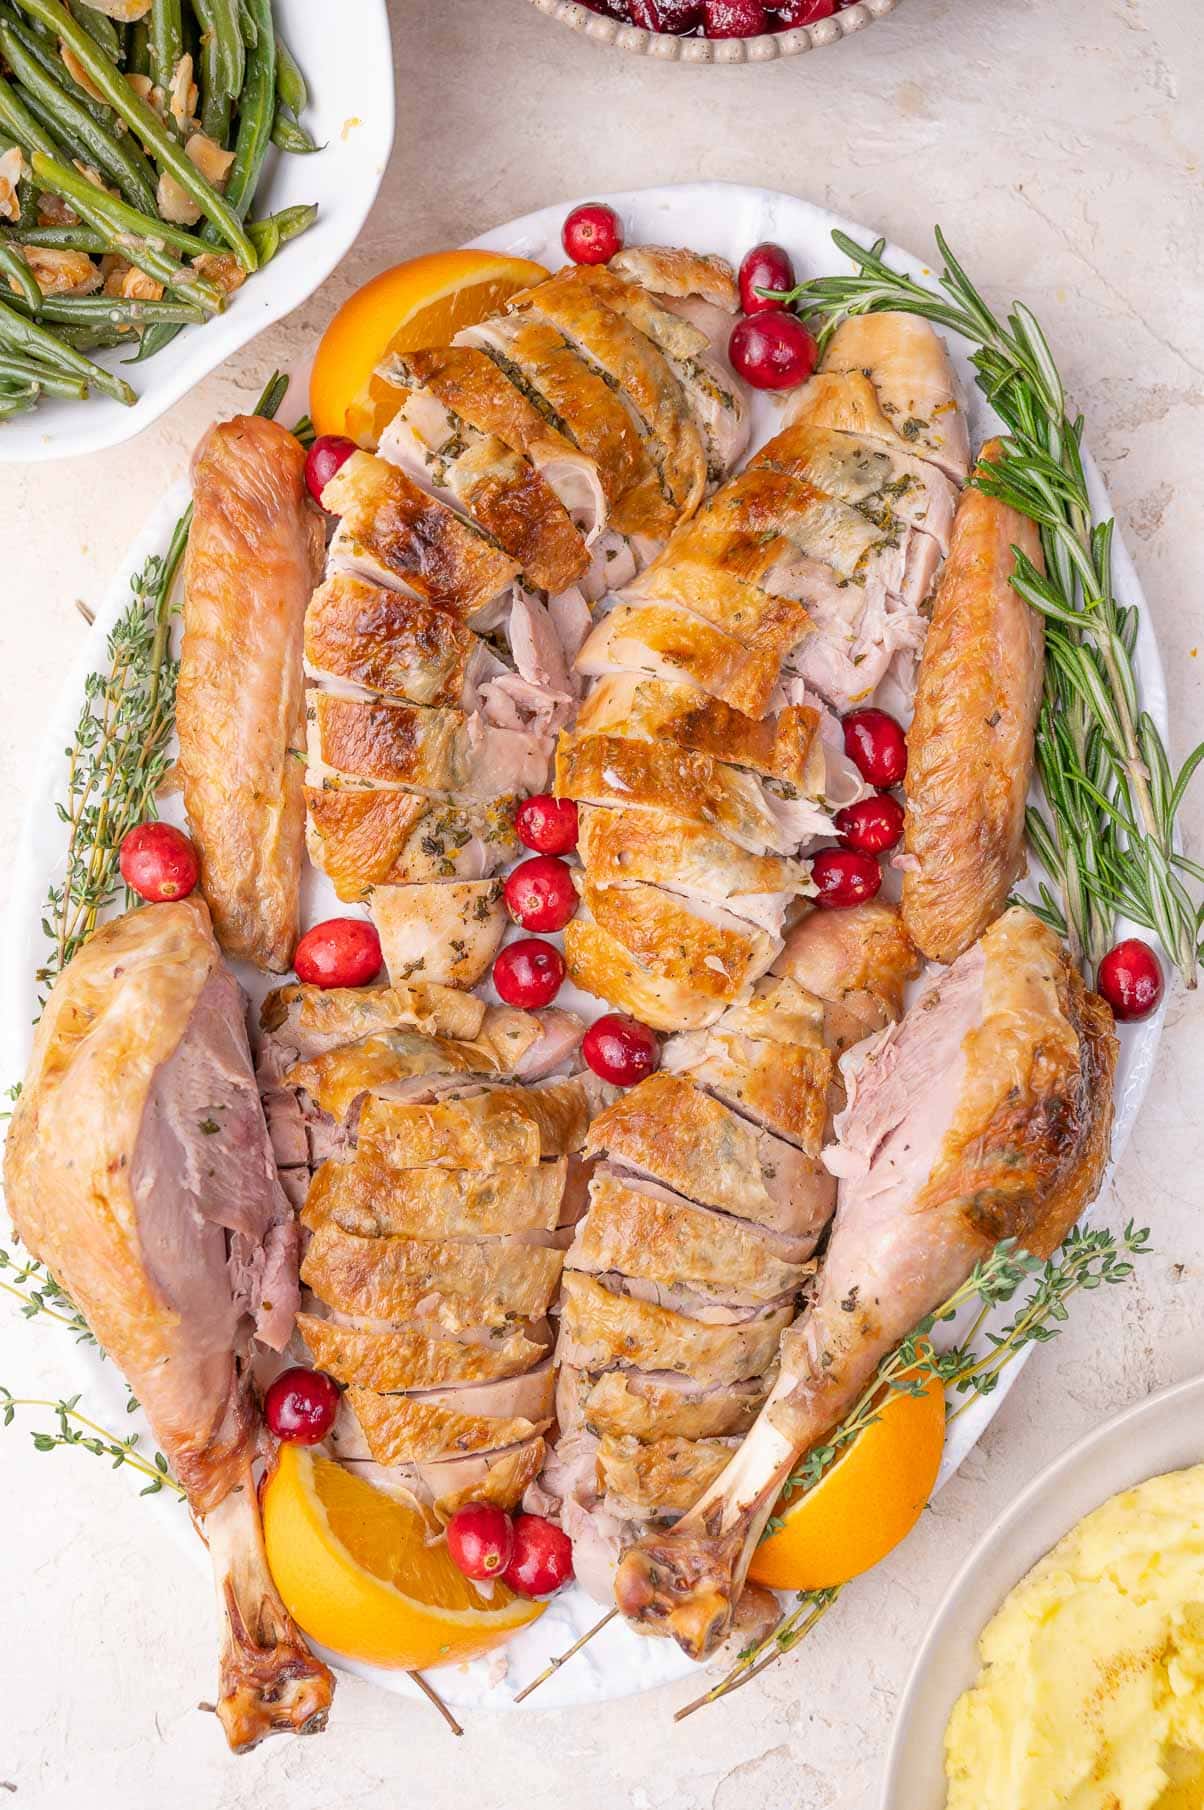
Take the turkey out of the oven, transfer it to another baking sheet. Let rest for at least 15 minutes (30 minutes would be better). Don’t worry, a whole turkey will keep warm for quite some time but if you cut it into pieces it will cool down pretty fast – always carve the turkey just before serving it.
While the turkey is resting, make the gravy.
Roast turkey gravy
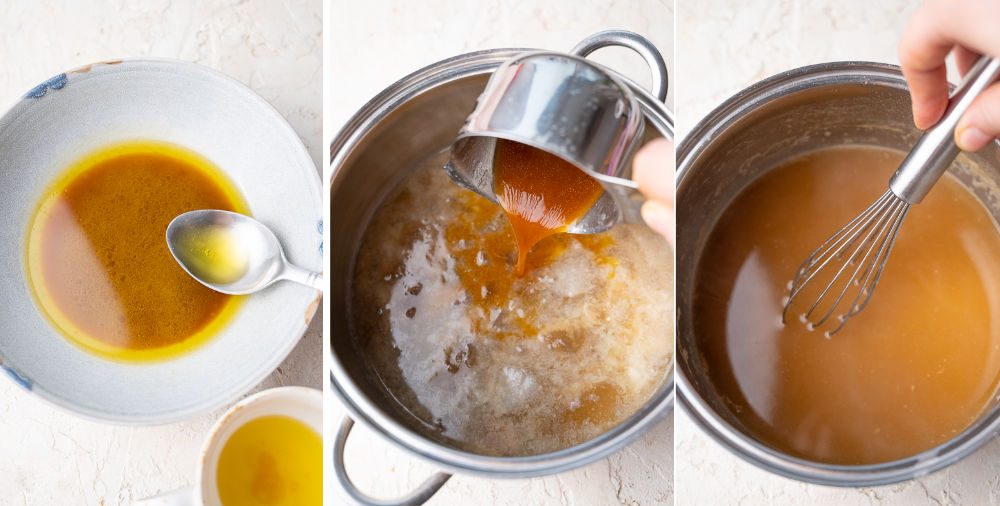
STEP 12: Pour all the pan drippings into a medium bowl (make sure to scrape all the brown bits from the bottom of the pan with a spatula). You’ll see brown liquid at the bottom of the bowl and yellow translucent liquid at the top (it’s fat). Using a spoon or a ladle scoop most of the yellow liquid at the top (you can discard it). Add the brown drippings into a medium pot (I’ve had 1/2 cup).
Combine 1/4 of cold broth with flour until there are no lumps of flour visible. Add it to the pot.
Add wine, remaining turkey broth, and Worcestershire sauce.
Cook the gravy for about 10 minutes or until thickened.
Season with black pepper to taste (it should be already salty enough but if it’s not season it lightly with salt).
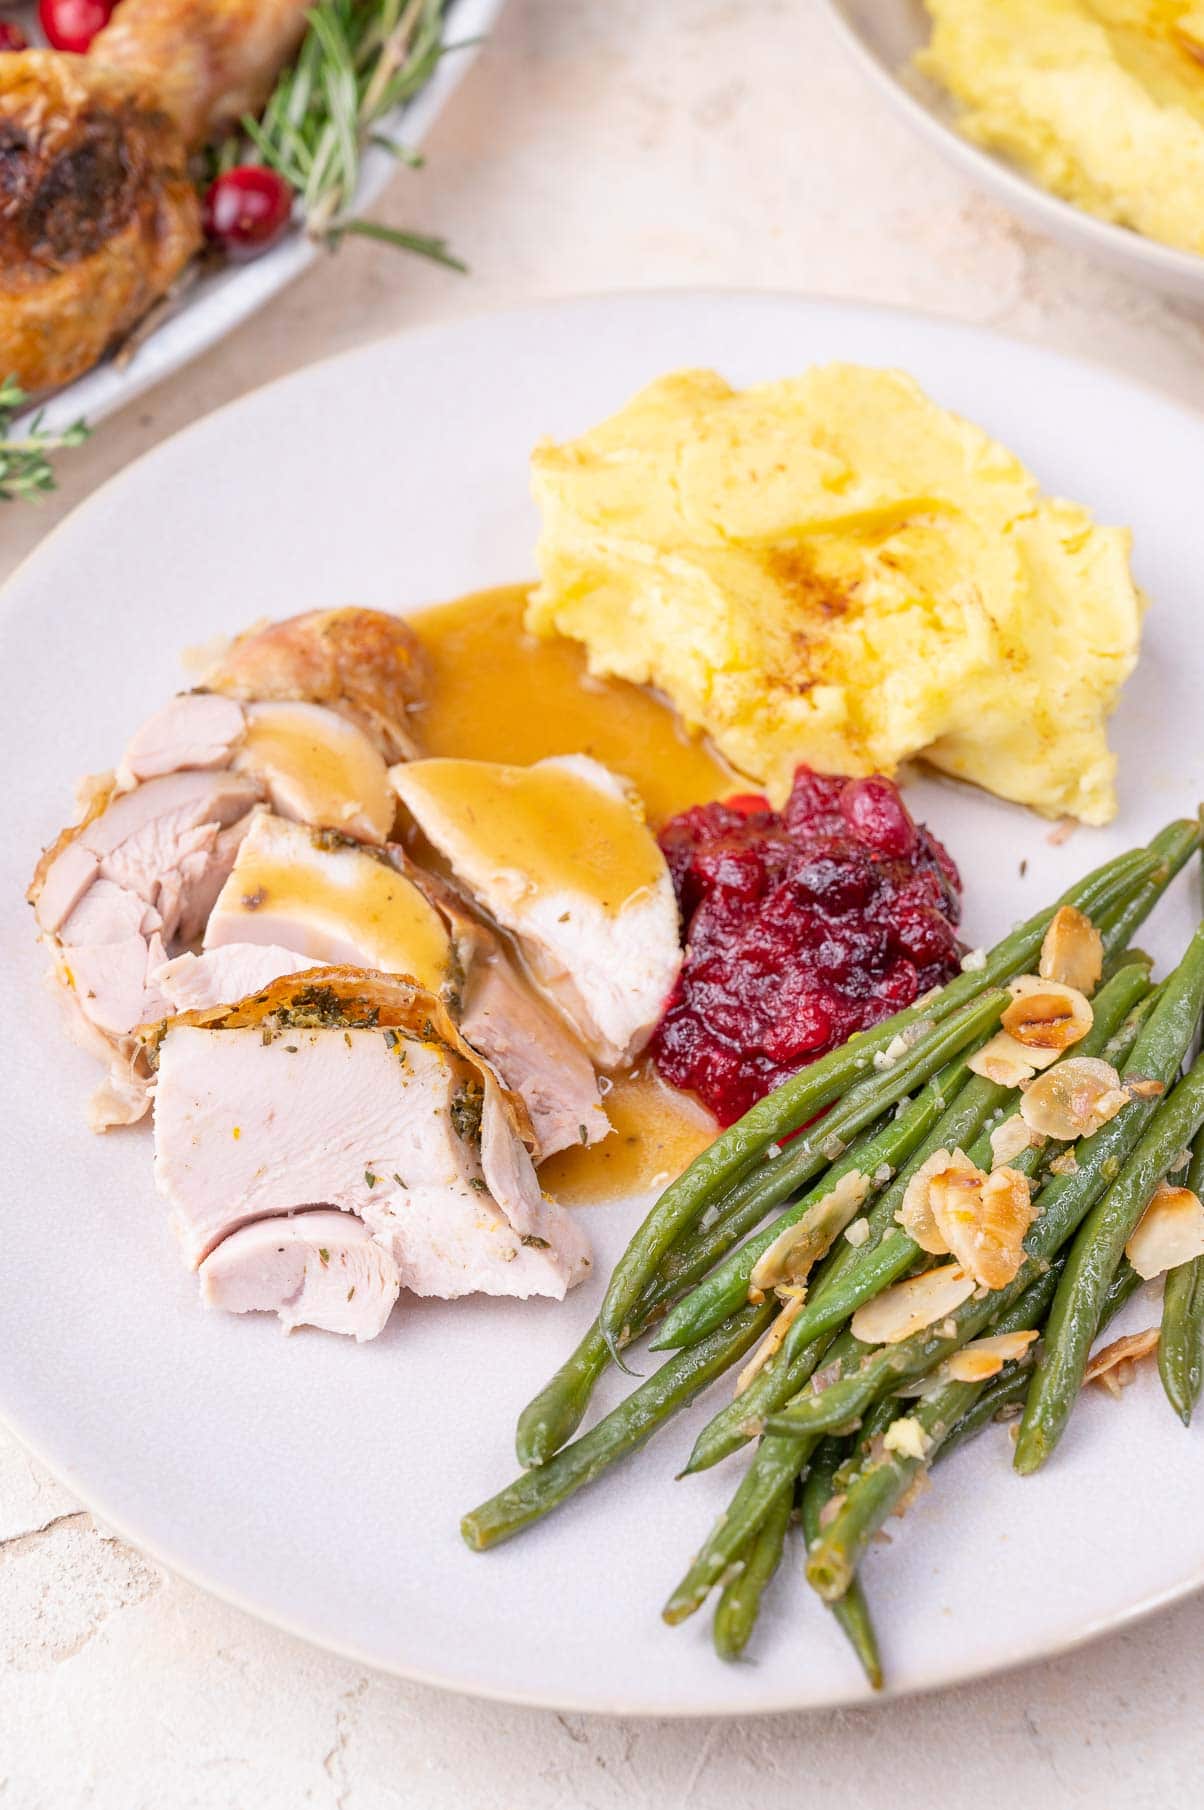
Serve: Carve the turkey when you have the gravy and all the sides ready (the whole turkey will be warm pretty long but it will cool down quickly when carved).
Enjoy!
Storage
You can store the turkey in the fridge for up to 3-4 days. It can also be frozen for up to 3 months.
How to reheat roast turkey: I usually carve the whole turkey and pan-fry the leftovers in a pan with butter. Another great option to reheat turkey meat is to steam it, this way you can gently warm up the meat without drying it out.
What to do with leftovers
The most important thing – don’t throw away turkey bones and carcass! You can easily make a homemade turkey broth from them that tastes really amazing. You can use it as a base for this turkey wild rice soup or turkey tortilla soup, along with turkey meat. You can also use up the leftover meat to make these leftover turkey quesadillas.
How to make turkey broth from leftover bones and carcass:
- add all the bones into a large pot
- add some veggies chopped into large chunks: 1 onion, 2 carrots, 2 ribs celery
- add aromatics: a couple of dried mushrooms, 2 allspice berries, 2 bay leaves, 10 black peppercorns, 1 clove garlic (I usually also add some fresh herbs to my poultry broth but not here since the roast turkey was already seasoned with herbs), I’m not adding any salt
- add enough water to cover all the ingredients + 1-inch (2 cm) more, bring to a boil, then simmer over low heat for about 1 1/2 – 2 hours
- leave to cool then store in the fridge for up to 3-4 days or freeze for up to 3 months.
Serving suggestions
- Cranberry Orange Sauce
- Cream Cheese Mashed Potatoes
- Green Beans Almondine
- Butternut Squash Soup with Coconut Milk
- Pumpkin Mac and Cheese
- Green Bean Casserole (from scratch!)
- Honey Glazed Carrots (quick stovetop glazed carrots)
- Sour cream mashed potatoes with chives
- Butternut Squash Apple Soup
How much turkey do you need per person?
- For 6 people – 8 pound (4kg) turkey
- For 8 people – 10 pound (5kg) turkey
- For 10 people – 12 pound (6kg) turkey
- For 12 people – 15 pound (7kg) turkey
- For 14 people – 18 pound (8kg) turkey
How to quickly thaw turkey?
The best way to thaw a frozen turkey is to let it thaw in the refrigerator. Make sure it’s still in its plastic wrapping or wrap it tightly in plastic foil. Place it on a rimmed tray to make sure that no liquid drips off in your fridge. The turkey will thaw in the fridge in 24 hours per 5 pounds (2.3kg).
If you’re short on time, you can thaw your turkey more quickly by placing it in a sink filled with cold water. Make sure your turkey is in its plastic wrapping and it’s fully submerged in the water (weigh it down with a pot to keep it in the water). Change the water every 30 minutes. The turkey will thaw after a 1/2 hour per 1 pound (450g) of turkey.
Did you make this recipe? RATE THE RECIPE or tell me in the COMMENTS how you liked it! You can also add a photo of your dish. It would make me very happy and will help other readers. Thank you!!
Spatchcock Turkey
Ingredients
for the turkey:
- 11 lbs (5kg) turkey
- 2 1/4 tablespoons table salt
- 5 tablespoons soft butter
- 2 1/2 tablespoons chopped herbs thyme, rosemary, and sage
- zest grated from 1 small orange
- 2 cloves garlic
- ground black pepper
- 1 tablespoon olive oil
for the turkey broth:
- turkey neck, giblets, backbone, wishbone, tips of the wings
- 1 large carrot
- 1 celery rib
- 1 onion
- 2 cloves garlic
- a couple of sprigs thyme
- 2 bay leaves
- 3 allspice berries
- 10 whole black peppercorns
- 4-5 small pieces of dried mushrooms
for the gravy:
- 1 1/2 cups turkey broth 360ml
- pan drippings
- 1/4 cup dry white wine 60ml
- 2 tablespoons flour
- 1 teaspoon Worcestershire sauce
- ground black pepper to taste
Would you like to save this?
Instructions
Prepare the turkey (spatchcock the turkey):
- Make sure your turkey is completely thawed. Remove the bag with neck and giblets from the turkey cavity – you can reserve them for the broth.
- Clean the turkey with wet paper towels then pat it dry with dry paper towels.
- Place the turkey on a large rimmed baking sheet breast side-down. Localize the backbone of the turkey. Using poultry shears remove the backbone (cut along one side of the backbone, from the tail to the neck, and repeat on the other side).
- Using a small pairing knife, remove the wishbone – it’s a small, V-shaped bone that can be found at the top of the breasts.
- Cut off the tips of the wings if they’re still attached.
- Reserve the backbone, wishbone, and wing tips for the gravy.
- Turn the turkey breast side up. Firmly press down on the turkey breast until it lays flat on the baking sheet (you need to crack the bones).
- NOTE: If you have a very large bird: Spatchcocking the turkey is really easy when handling small or medium-sized birds. When trying this recipe with an 18 pound (8kg) turkey, I’ve found cutting the backbone at the tail side be very difficult. Although I have good-quality poultry shears I couldn’t cut through the bones around the tail – they were simply too thick. I ended up cutting through the joint between the backbone and the legs so I removed a little bit more of the bone/tail part of the turkey. I also had a problem with cracking the breast bones so that the breasts lay flat on the baking sheet, so I just cut through the ribs close to the sternum of the bird. Although it was a little bit problematic to prepare a large turkey using this method, it all worked out really well, the turkey came out amazing and I would still recommend this method for a large turkey, just be prepared that it may not be that easy.
Dry brine the turkey
- Detach the skin from the breasts and legs (be careful not to tear it).
- Rub the turkey all over with salt, especially under the loosened skin.
- Wrap the turkey and baking tray with plastic foil and place in the fridge. Leave the turkey to dry brine for 2 days.
- The salt amount: adjust the amount of salt to the weight of the turkey. I’ve used 1 1/2 Tbsp of table salt for a 7 1/2 pound (3,4 kg) turkey and 3 1/3 Tbsp for a 18 lbs (8kg) turkey.
Make turkey broth:
- Add the reserved turkey neck, giblets (I’m only using the heart because I don’t like the others, but use them if you don’t mind their strong flavor), wing tips (if you have them), wishbone, and cut into smaller pieces backbone into a large pot.
- Peel the carrot and onion. Chop carrot, onion, celery into large chunks. Add them to the pot. Add the garlic (can be unpeeled), mushrooms, herbs, and spices to the pot. I’m not adding any salt.
- Add enough water to cover the ingredients. Bring to a boil then simmer over very low heat for about 2 hours.
- Strain the liquid through a fine-mesh strainer, cool down, and put in the fridge. It will turn into jelly when cold and this is normal. You can discard all the vegetables and bones.
Bake the turkey
- Take the turkey out of the fridge 1 hour before you plan on baking it.
- Make the orange herb butter: combine soft butter with finely chopped herbs, grated orange zest, minces cloves garlic, and black pepper (I’m not adding any salt).
- Spread the butter everywhere under the skin. Do not spread it on top of the skin – the herbs would burn in a hot oven. Brush the skin with olive oil.
- Spread the turkey as flat as possible on the baking tray. For a large turkey, you can spread the legs more to the sides instead of tucking them close to the breasts.
- Preheat the oven to 400°F (200°C).
- When the oven is hot, place the baking sheet in the oven and bake the turkey until the skin is golden brown and the turkey is cooked through.
- To check if the turkey is cooked through, measure the temperature of the meat with a thermometer. To measure the temperature correctly, insert the probe into the deepest part of the breast, being careful to not go so deep as to hit the bone. Confirm the temperature in both sides of the breast. It should reach 165°F (74°C) for the breast and between 170-175°F (77-80°C) for the thigh. I'm actually taking the meat out of the oven when the breast reaches 158°F (70-71°C) and it comes to a safe temperature while resting. You need to be careful to not overcook the breast meat (it will be dry) but you don't have to worry about the thighs – they actually are better when cooked longer.
- I baked my 11 lbs (5kg) turkey for 1 hour and 20 minutes.
- I baked a small 7 1/2 pound (3.4 kg) turkey for 45 minutes until the breast was at 145°F (63°C) then I turned on the fan+grill setting to brown the skin (you can also move the turkey one rack higher and turn on the burner) and baked the turkey until the breast has reached 158°F (70-71°C).
- A large turkey – 18 lbs (8kg): I baked it for 1 hour and 20 minutes at 400°F (200°C) then I reduced the temperature to 325°F (160°C) (otherwise it would burn) and baked it for 40 more minutes (2 hours in total).
- You can use an instant-read thermometer or a grill thermometer to measure the temperature. I especially recommend a grill thermometer – you insert the probe into the meat and it stays there for the whole baking time. The thin wire goes through the door of the oven and the thermometer stays outside. You can set your thermometer to the desired temperature and when your turkey reaches it, the timer will let you know that your turkey is ready. This way you don’t have to check on the turkey and open the oven door which decreases the temperature of the oven.
- Take the turkey out of the oven, transfer it to another baking sheet. Let rest for at least 15 minutes.
- While the turkey is resting, make the gravy.
Make the gravy:
- Pour all the pan drippings into a medium bowl (make sure to scrape all the brown bits from the bottom of the pan with a spatula). You’ll see brown liquid at the bottom of the bowl and yellow translucent liquid at the top (it’s fat). Using a spoon or a ladle scoop most of the yellow liquid at the top (you can discard it). Add the brown drippings into a medium pot (I’ve had 1/2 cup).
- Combine 1/4 of cold broth with flour until there are no lumps of flour visible. Add it to the pot.
- Add wine, remaining turkey broth, and Worcestershire sauce.
- Cook the gravy for about 10 minutes or until thickened.
- Season with black pepper to taste (it should be already salty enough but if it’s not season it lightly with salt).
Serve:
- Carve the turkey when you have the gravy and all the sides ready (the whole turkey will be warm pretty long but it will cool down quickly when carved).
- Enjoy!
Notes
- You can use store-bought chicken broth if you don’t want to make turkey broth but it really takes just 5 minutes to prepare and tastes much better.
- You can also make tasty broth from roasted bones and carcass of the turkey. The instructions are in the post.
- Calories = 1 serving (1/10 of the recipe), this is only an estimate!

No Comments