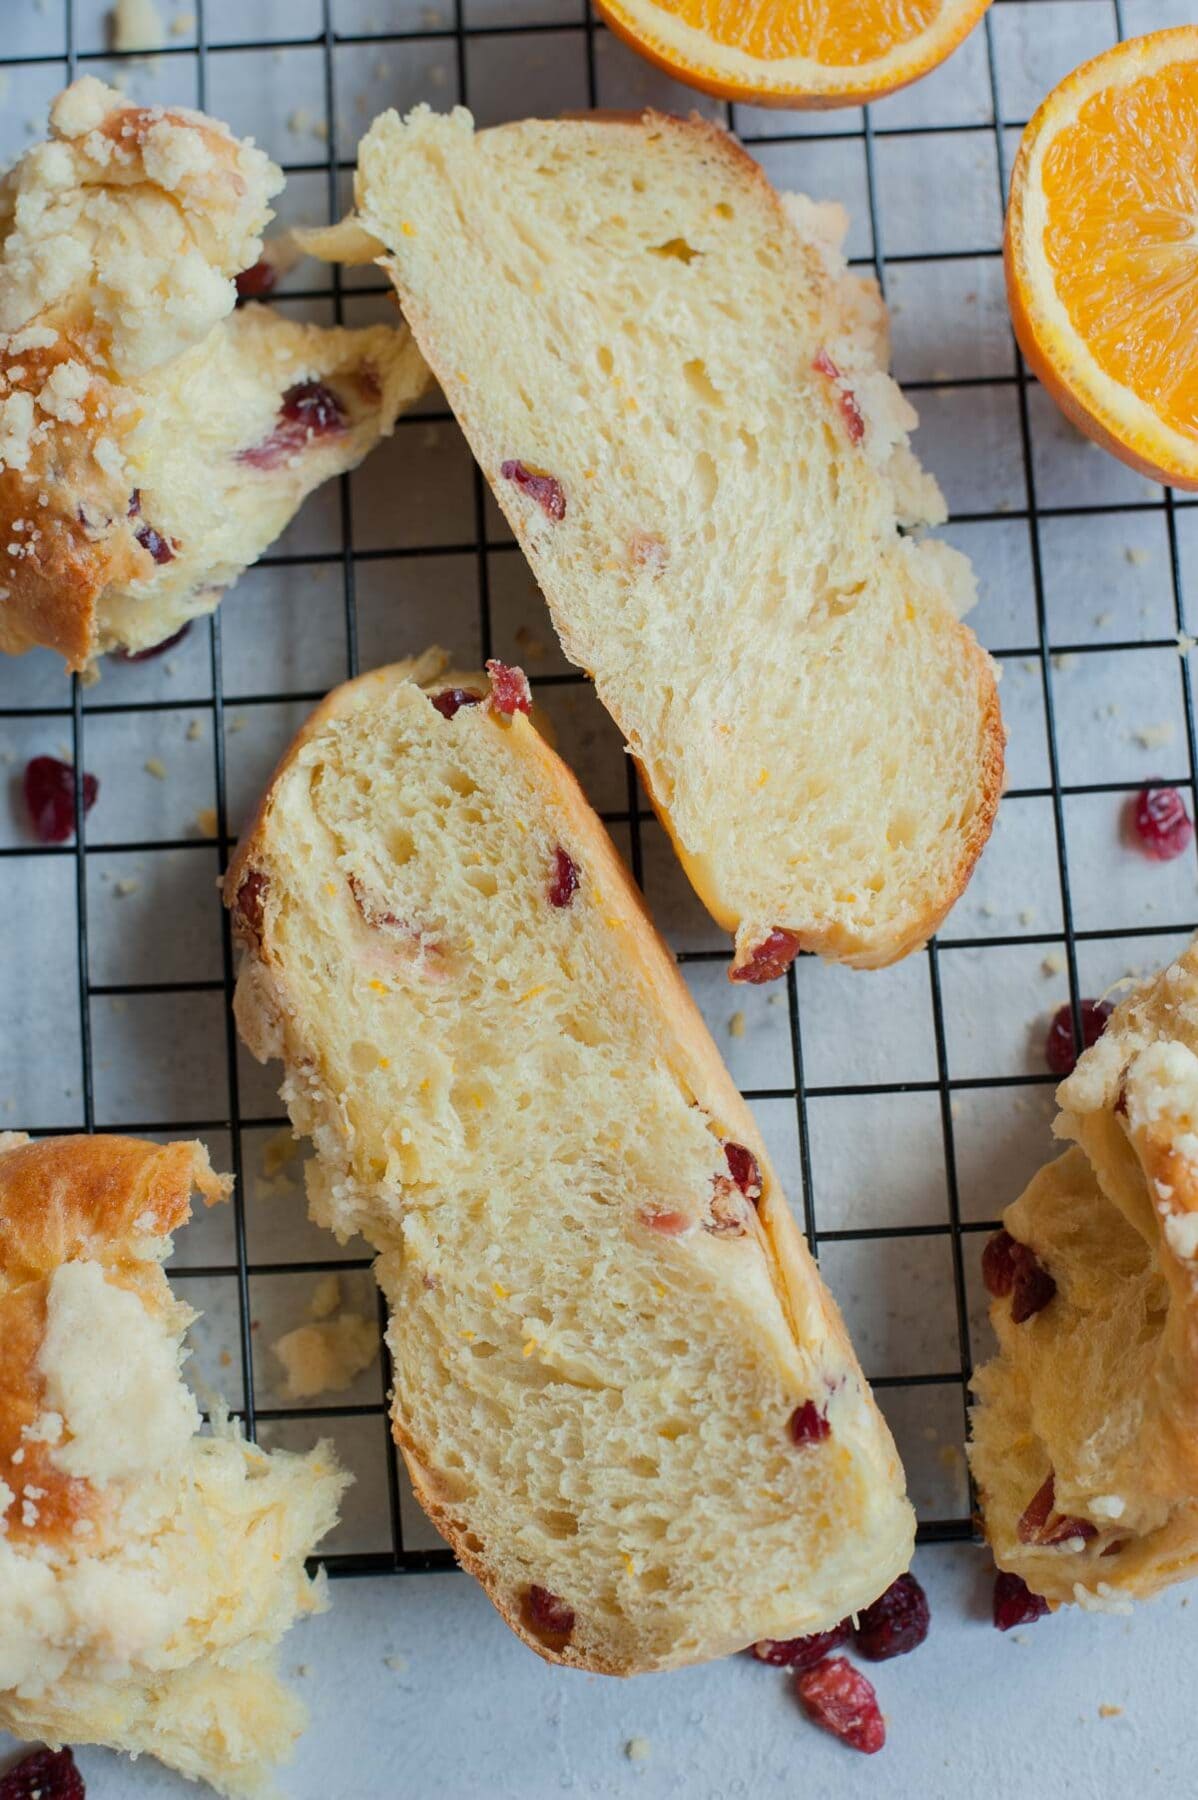
Delicious buttery brioche with dried cranberries, flavored with orange zest, and topped with crunchy crumble. This braided brioche is super easy to make (given that you have a stand mixer), but requires a little patience – the dough has to rest overnight in the fridge to develop great flavor and texture. It‘s definitely worth it – you’ll be rewarded with a wonderfully smelling, fluffy, and buttery bread!

What is brioche bread?
Brioche is a yeast-leaven French bread that contains a lot of butter and eggs in comparison to regular yeast dough. It’s super fluffy and buttery. This is the tastiest yeast dough you can make!
Traditionally brioche is baked as a loaf but I simplified it by baking it in braided form, so it looks like a challah. What is the difference between braided brioche and challah? As mentioned above, brioche bread is enriched with butter and eggs, needs more time to rise (overnight), while challah is more calorie-friendly and quicker to make (but also less fluffy and less buttery!).
When I make a traditional brioche, I’m using even more butter but I added a little less for this recipe because this is a free-form bread and it would be too flat otherwise.
Ingredients:
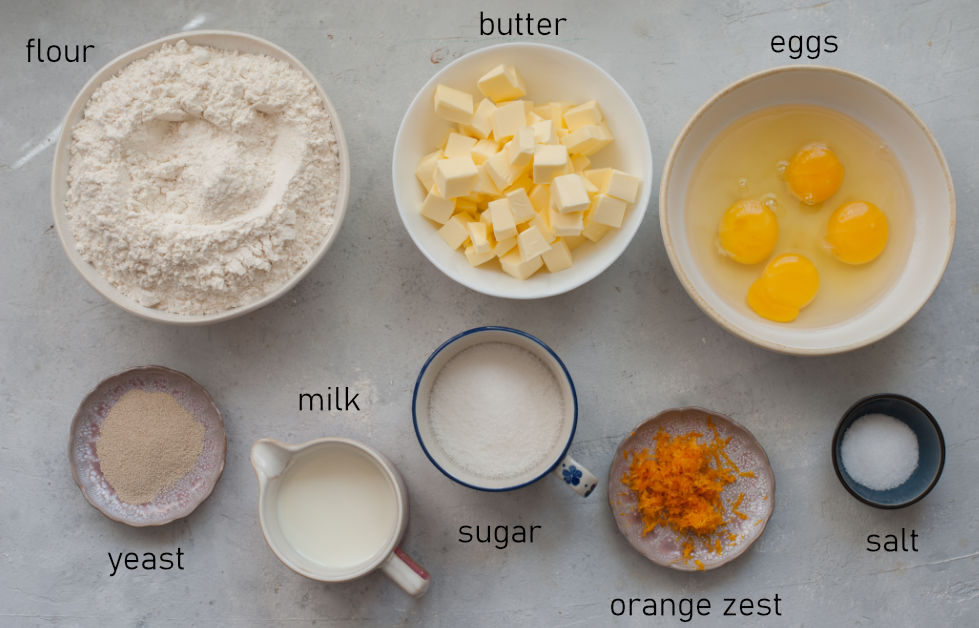
For the brioche dough you will need:
- flour – regular all-purpose flour
- butter – for the best flavor use European-style unsalted butter with 82% fat content, don’t use any butter substitutes/vegan butter/shortening
- eggs – use large eggs
- granulated sugar
- milk – use full-fat milk
- salt – so that the dough won’t taste flat!
- orange zest – is optional, but it flavors the dough with orange flavor, it smells beautiful! (you can omit it)
- yeast – you can use active dry yeast or rapid rise instant yeast
- Active dry yeast: needs to be left in warm milk for 10 mins to activate. This is an extra step but the advantage of using this type of yeast is that you’ll see right at the beginning if your yeast is working or not, and you won’t waste your ingredients. If after 10 mins there is no foam on top of your yeast you need to start over (your yeast are not active).
- Instant yeast (rapid rise) – can be added directly to the flour, but there is no way of knowing if the yeast is active before you see that your dough hasn’t risen!
- I tested this recipe with both types of yeast and it worked either way but I prefer to use active dry yeast to make sure they are working and also my bread has risen better with active dry yeast. I’m using the same amount of both types of yeast (1 packet = 7g = 2 1/4 teaspoon). I’m aware that you should use 25% less active dry yeast than instant yeast but using 1 packet of each (for convenience) worked well with this recipe.
Additionally, you will need:
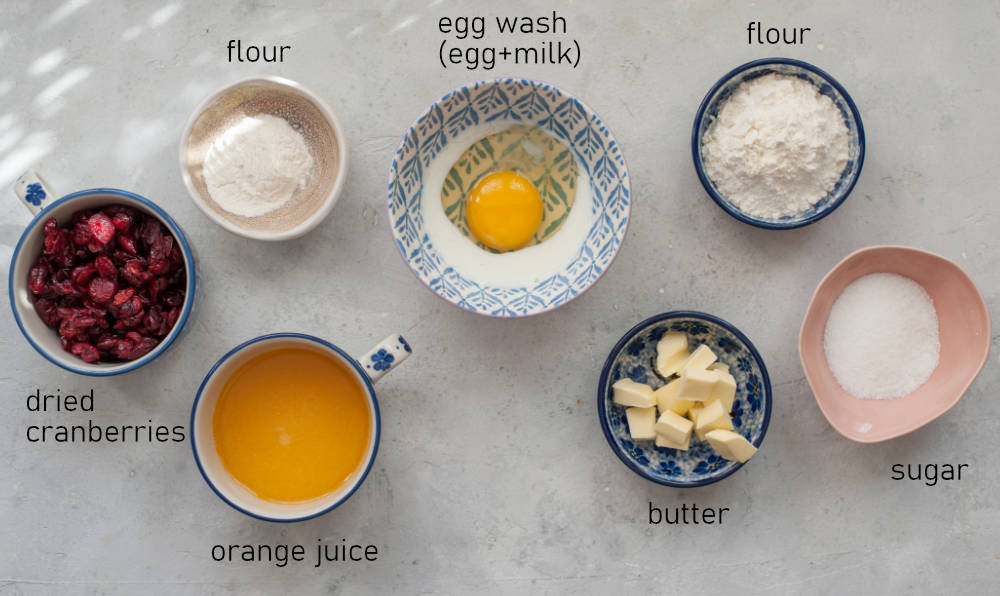
- Dried cranberries soaked in orange juice – you can omit adding them and just bake a basic brioche but I really think it’s worth it! I’m soaking the cranberries in orange juice to get more orange flavor to the brioche. If you’d like even more orange flavor – add some chopped candied orange peel to the dough.
- Flour – to absorb the moisture on the dried cranberries.
- Egg wash: an egg beaten with milk – gives beautiful golden color.
- Ingredients for the crumble (flour, sugar, butter) – you can also omit adding crumble but it’s so delicious so please please make it! I would rather omit adding cranberries and orange zest but leave the crumble.
How to make braided brioche step by step:
This recipe requires the use of an electric mixer fitted with a hook attachment because the dough for brioche is quite wet and sticky and needs to be kneaded much longer than a traditional yeast dough. High fat content in the dough causes slower gluten formation, which gives the dough elasticity. It would be very difficult to knead the dough by hand!
The first day
A small reminder – how to measure flour:
How to measure flour: if you will use a kitchen scale to measure out all the ingredients, it all goes easy breezy! But if you’re using measuring cups, remember that 1 cup of flour can weigh 120-150g, depending on how you’re filling your cup. Don’t scoop the flour directly into the measuring cup, which can compact it! 1 cup of flour in my recipes weighs 125g. To correctly measure the flour, you need to:
- Fluff the flour by stirring it in the bag/flour container with a spoon.
- Spoon the flour and sprinkle it into your measuring cup.
- Sweep off the excess flour with the back of a knife.
I highly recommend using a scale for this recipe. If you will measure the flour differently than I did (for example your 1 cup of flour will weigh 150g), you can end up with 3/4 cup more flour than needed since this recipe calls for 4 cups of flour!
STEP 1: Warm up the milk until pleasantly warm to the touch. It’s best to check the temperature with a thermometer – it should be 100-110°F (38-43°C). The milk can’t be too cold (yeast won’t work) or too warm (you will deactivate the yeast completely).
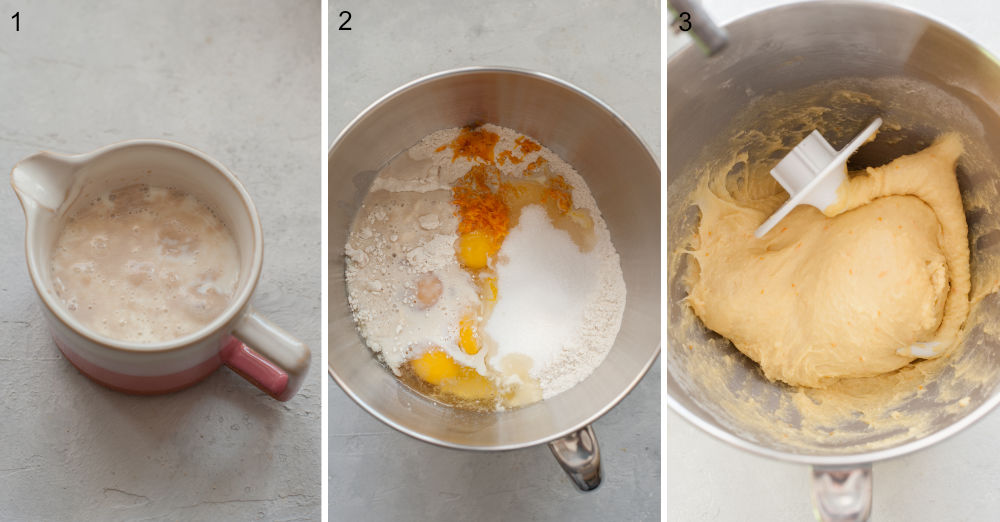
STEP 2 (photo 1): If using active dry yeast: add the yeast to the warm milk, stir, and leave for 10 minutes. After this time there should be foam on the surface of milk – this is a sign that the yeast is working. If there is no foam, you need to start over. If using instant yeast – they can be added directly to the flour.
STEP 3 (photo 2): Add the flour into a large mixing bowl. Stir in the salt. Add eggs, sugar, orange zest, activated active dry yeast with milk, or instant yeast and warm milk. Don’t add the butter yet.
STEP 4: Stir the dough with a wooden spoon until roughly combined.
STEP 5 (photo 3): Knead the dough using a stand mixer fitted with a dough hook attachment. Knead the dough at low speed (setting 2) for about 10 minutes, until smooth and well-combined (it will be sticky and loose, don’t add more flour).
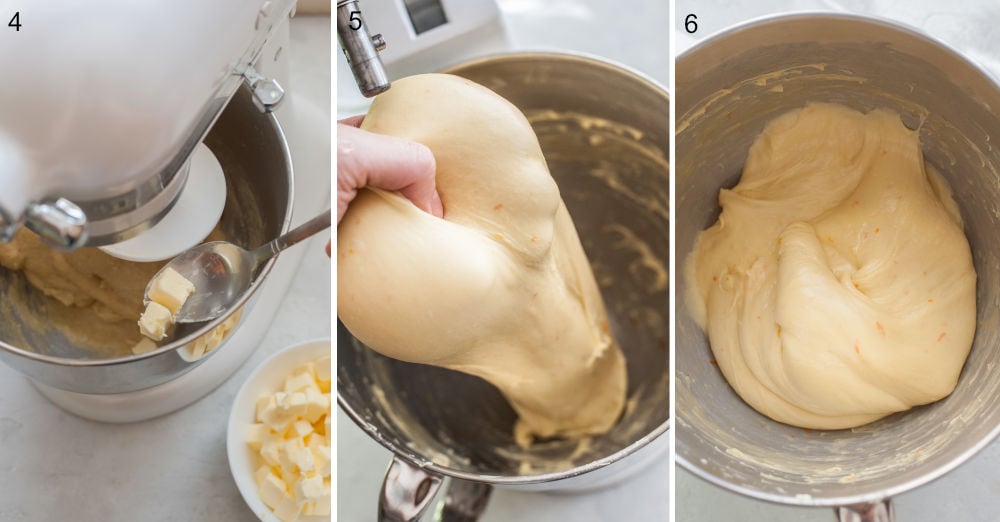
STEP 6 (photo 4): Now gradually add the butter, 2-3 small cubes at a time. Add the next portion of butter only if the previous one is incorporated into the dough. The whole process of adding butter should last 10-15 minutes. After adding the butter knead the dough for a couple more minutes.
Photo 5 + 6: The dough is ready when it’s shiny, silky-smooth, and doesn’t stick to your fingers and sides of the bowl. You should be able to grab the dough and lift it out of the bowl without scraping it from the sides of the bowl. The dough won’t be firm, it will be very loose! – this is how it supposed to be, don’t add more flour! If the dough is very sticky and you’re sure you’ve measured everything correctly (see the note above regarding measuring flour), you just need to knead it longer until it is no longer sticky.
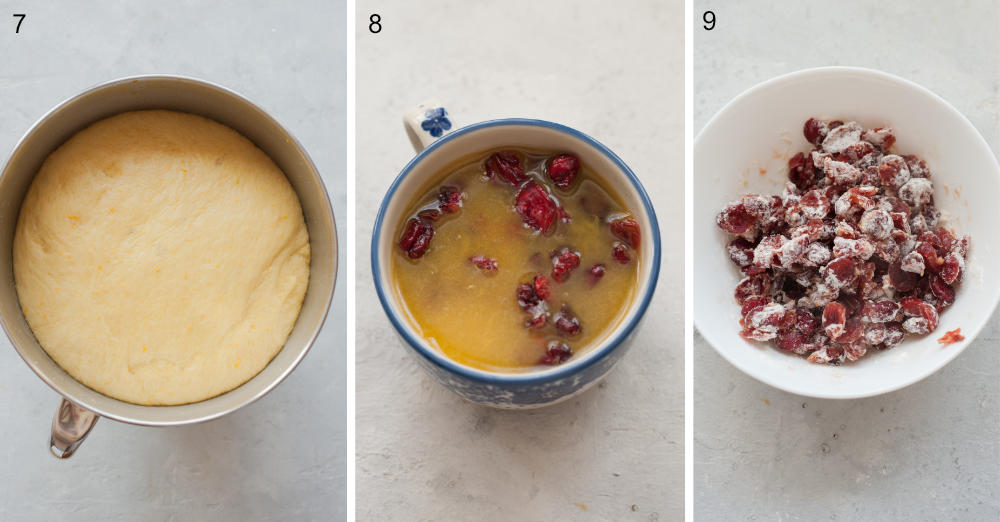
STEP 7 (photo 7): First rise: Cover the bowl with plastic foil or kitchen towel and place in a warm place until doubled in volume (or almost doubled in volume, it will rise further in the fridge). It should take about 1-1.5 hours (it can be even 3 hours depending on how warm is in your place). I’m putting the bowl into the oven with the light turned on (no temperature, just the light).
STEP 8: Second rise (in the fridge): Take the dough out of the bowl and knead it a couple of times. Form a smooth ball and put it again into the bowl. Cover with plastic foil or kitchen towel and put in the fridge for a minimum of 6 hours or overnight (for up to 24 hours).
STEP 9 (photo 8): Pour the orange juice into a cup and add the cranberries. Put them in the fridge to soak overnight.
The next day:
STEP 10: Take the dough and cranberries out of the fridge.
STEP 11 (photo 9): Drain the cranberries (we won’t need the orange juice), pat dry lightly with paper towels then toss with flour.
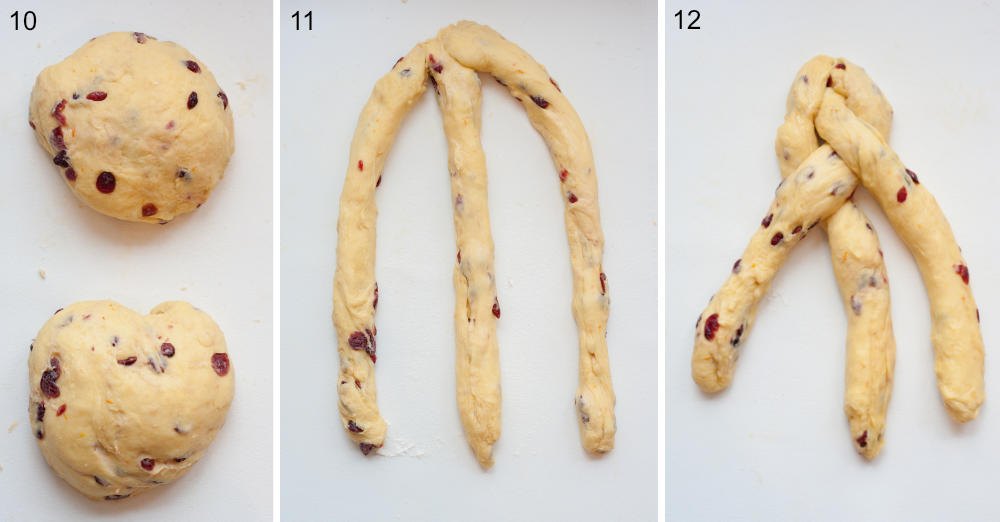
STEP 12: Knead the cranberries into the dough by hand (sprinkle the dough with more flour if it’s sticky, but don’t add much).
STEP 13 (photo 10): Divide the dough into 2 equal parts, then divide each of those into 3 parts.
STEP 14 (photo 11+12): Braid the brioche: Take 3 parts of the dough, stretch and roll each piece into a rope about 14-inches (35cm) long. If the ropes shrink a bit, let them rest for about 5 minutes. Lay the ropes parallel to one another (vertically). Pinch them tightly together at the top, and then fan them out. Braid the ropes together like braiding hair and squeeze the other ends together when complete. It should look like a challah. Repeat with the remaining dough (the recipe yields 2 loaves of bread).
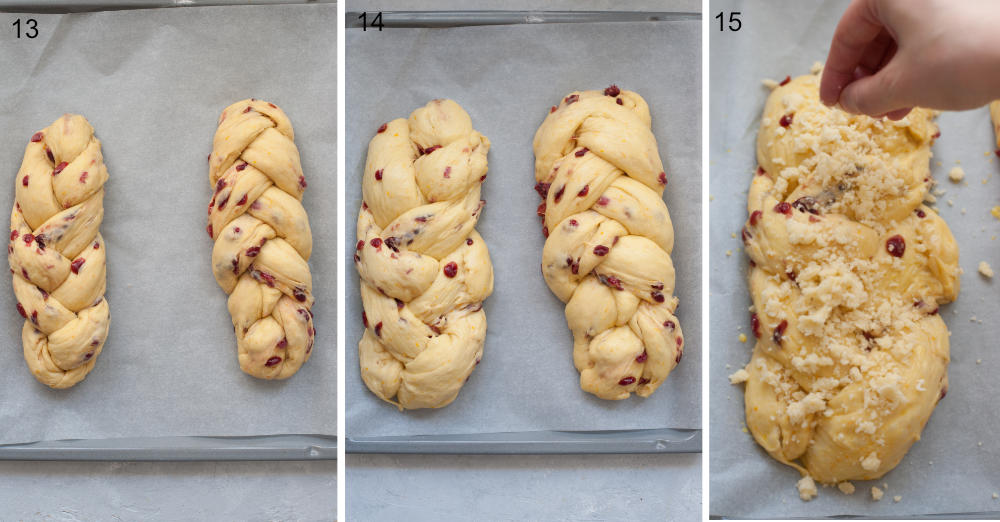
STEP 15 (photo 13+14): Third rise: Place the braids on a baking sheet lined with parchment paper, cover with a plastic foil and leave to rise in a warm place for about 1-2 hours or until doubled in volume. I put them in the oven with just the light turned on.
STEP 16: Take both braids out of the oven and preheat it to 350°F/180°C/Gas Mark 4, no fan.
STEP 17: Make the egg wash: beat the egg with milk and brush both loaves with the mixture.
STEP 18 (photo 15); Make the crumble: combine flour, sugar, and cold butter in a small bowl. Rub the butter with flour and sugar with your fingers until crumble forms. Sprinkle brioche with the crumble.
STEP 19: Bake brioche for about 35 minutes or until golden.
STEP 20: Transfer to a wire rack to cool. Cut into slices with a serrated knife.
Enjoy!
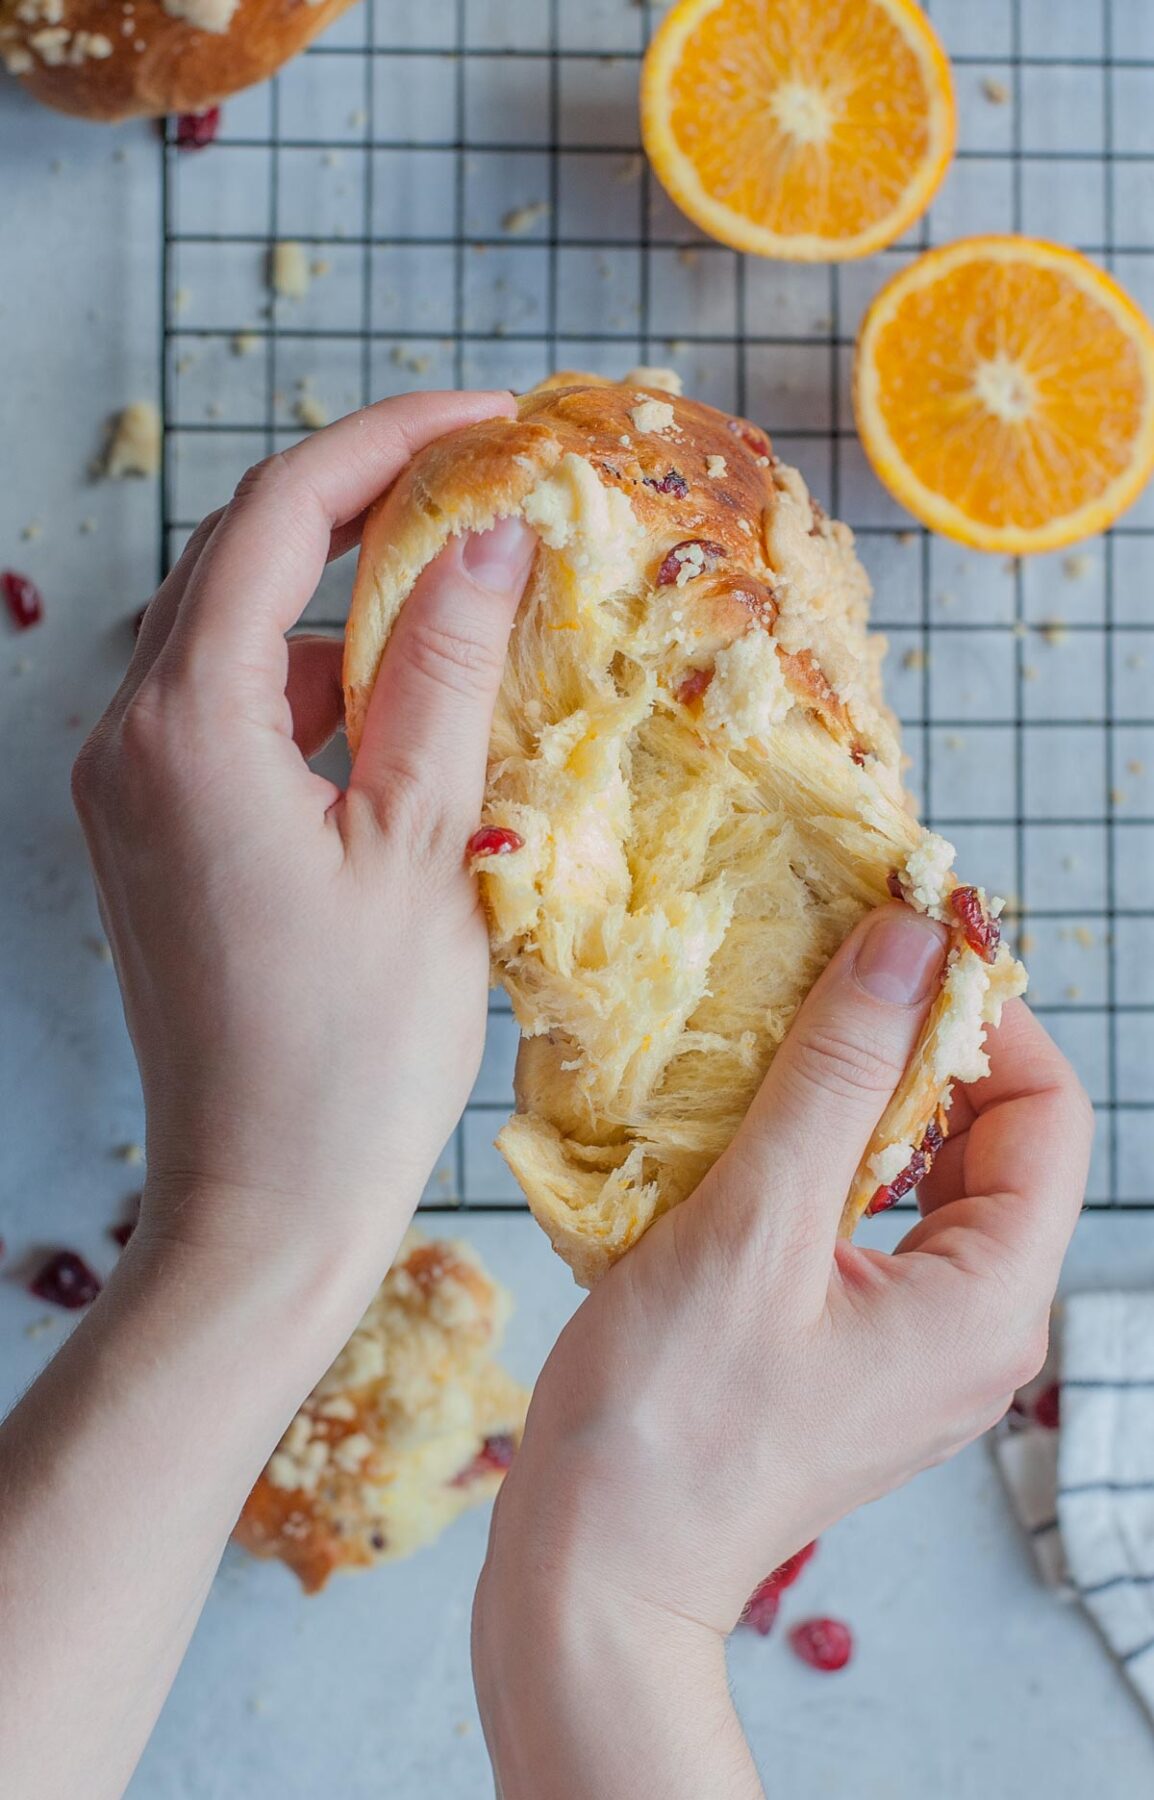
How to serve this braided brioche:
- It’s so delicious you can eat it on its own! I seriously think a pat of butter would be too much, that’s how buttery and delicious it is.
- It’s lovely with any kind of jam or marmalade.
- Make a cinnamon toast!
- This recipe yields 2 loaves of bread, we usually eat one loaf on its own or with jam and from the second I make brioche bread pudding! I used 1-week old brioche for this recipe! It was completely dry but good enough for a bread pudding.
Storage:
This brioche bread keeps well for 3 days! Keep it in a dry cool place wrapped in a clean kitchen towel. We usually eat one leaf with some marmalade or jam and I make brioche bread pudding from the second loaf – it was perfect for that even after a week!
You can freeze the brioche dough and baked brioche.
FAQ:
Theoretically, yes. The second rise is needed to achieve great flavor and texture of the bread. It won’t taste as good without it. The second reason for this is to chill the dough. It would be very difficult to form loaves without chilling the dough.
Yes and yes. I wouldn’t halve it personally, it just too much work to make this bread and get just one loaf! You could also bake one braided brioche and make hamburger brioche buns from the remaining dough!
Yes, you can bake plain braided brioche.
Yes, you may need to bake it a bit longer, as the bread will be thicker.
It just means it’s too warm in your kitchen. You can try to chill the dough a bit.
Did you make this recipe? RATE THE RECIPE or tell me in the COMMENTS how you liked it! You can also add a photo of your dish. It would make me very happy and will help other readers. Thank you!!
Did you make this recipe? RATE THE RECIPE or tell me in the COMMENTS how you liked it! You can also add a photo of your dish. It would make me very happy and will help other readers. Thank you!!
Cranberry orange braided brioche bread
Ingredients
for the brioche dough:
- 1 packet (7g or 2 1/4 ts) active dry yeast or rapid rise instant yeast
- 1/3 cup (80g) milk
- 4 cups (500g) flour
- 1.5 teaspoons fine sea salt
- 2 tablespoons orange zest
- 1/3 cup (70g) granulated sugar
- 4 large eggs
- 1 3/4 sticks (200g) soft unsalted butter 14 Tbsp, European-style, 82% fat
additionally:
- 1/2 cup (120g) orange juice
- 3/4 cup (90g) dried cranberries
for the crumble:
- 1/3 cup (40g) flour
- 2 tablespoons (30g) cold butter
- 2 tablespoons (25g) sugar
for the egg wash:
- 1 egg
- 1 tablespoon milk
Would you like to save this?
Instructions
The first day:
- Warm up the milk until pleasantly warm to the touch. It’s best to check the temperature with a thermometer – it should be 100-110°F (38-43°C). The milk can’t be too cold (yeast won’t work) or too warm (you will deactivate the yeast completely).
- If using active dry yeast: add the yeast to the warm milk, stir, and leave for 10 minutes. After this time there should be foam on the surface of milk – this is a sign that the yeast is working. If there is no foam, you need to start over. If using instant yeast – they can be added directly to the flour.
- Add the flour into a large mixing bowl. Stir in the salt. Add eggs, sugar, orange zest, activated active dry yeast with milk or instant yeast and warm milk. Don’t add the butter yet.
- Stir the dough with a wooden spoon until roughly combined.
- Knead the dough using a stand mixer fitted with a dough hook attachment. Knead the dough at low speed (setting 2) for about 10 minutes, until smooth and well-combined (it will be sticky and loose, don’t add more flour).
- Now gradually add the butter, 2-3 small cubes at a time. Add the next portion of butter only if the previous one is incorporated into the dough. The whole process of adding butter should last 10-15 minutes. After adding the butter knead the dough for a couple more minutes.
- The dough is ready when it’s shiny, silky-smooth, and doesn’t stick to your fingers and sides of the bowl. You should be able to grab the dough and lift it out of the bowl without scraping it from the sides of the bowl. The dough won’t be firm, it will be very loose! – this is how it supposed to be, don’t add more flour! If the dough is very sticky and you’re sure you’ve measured everything correctly (see notes for how to measure flour), you just need to knead it longer until it is no longer sticky.
- First rise: Cover the bowl with plastic foil or kitchen towel and place in a warm place until doubled in volume (or almost doubled in volume, it will rise further in the fridge). It should take about 1-1.5 hours (it can be even 3 hours depending on how warm is in your place). I'm putting the bowl into the oven with the light turned on (no temperature, just the light).
- Second rise (in the fridge): Take the dough out of the bowl and knead it a couple of times. Form a smooth ball and put it again into the bowl. Cover with plastic foil or kitchen towel and put in the fridge for a minimum of 6 hours or overnight (for up to 24 hours).
- Pour the orange juice into a cup and add the cranberries. Put them in the fridge to soak overnight.
The next day:
- Take the dough and cranberries out of the fridge.
- Drain the cranberries (we won’t need the orange juice), pat dry lightly with paper towels then toss with flour.
- Knead the cranberries into the dough by hand (sprinkle the dough with more flour if it’s sticky, but don’t add much).
- Divide the dough into 2 equal parts, then divide each of those into 3 parts.
- Braid the brioche: Take 3 parts of the dough, stretch and roll each piece into a rope about 14-inches (35cm) long. If the ropes shrink a bit, let them rest for about 5 minutes. Lay the ropes parallel to one another (vertically). Pinch them tightly together at the top, and then fan them out. Braid the ropes together like braiding hair and squeeze the other ends together when complete. It should look like a challah. Repeat with the remaining dough (the recipe yields 2 loaves of bread).
- Third rise: Place the braids on a baking sheet lined with parchment paper, cover with a plastic foil, and leave to rise in a warm place for about 1-2 hours or until doubled in volume. I put them in the oven with just the light turned on.
- Take both braids out of the oven and preheat it to 350°F/180°C/Gas Mark 4, no fan.
- Make the egg wash: beat the egg with milk and brush both loaves with the mixture.
- Make the crumble: combine flour, sugar, and cold butter in a small bowl. Rub the butter with flour and sugar with your fingers until crumble forms. Sprinkle brioche with the crumble.
- Bake brioche for about 35 minutes or until golden.
- Transfer to a wire rack to cool. Cut into slices with a serrated knife.
- Enjoy!
Notes
- If you forgot to soak the cranberries overnight, cook them for a couple of minutes in the orange juice, drain, then leave to cool.
- Leftover orange juice can be used for cocktails or smoothies.
- Calories = 1 loaf (1/2 of the recipe). This is only an estimate!
Did you make this recipe? RATE THE RECIPE or tell me in the COMMENTS how you liked it! You can also add a photo of your dish. It would make me very happy and will help other readers. Thank you!!


16 Comments
Annelie
16 October 2024 at 23:24Can you make this with fresh cranberries ?
Aleksandra
17 October 2024 at 19:29I think it would be too tart
Kathy
10 December 2023 at 04:31I unfortunately read the recipe wrong and added the orange juice it seems to be still light fluffy and very sticky but manageable-can I actually bake it as a panettone?
Aleksandra
10 December 2023 at 08:15Maybe just add a little bit more flour so it’s not very sticky and bake? The dough should not be too loose or it will come out too flat. If it’s too loose maybe bake it in a bread pan (you would need 2-3 pans). I wouldn’t bake it as a Panettone. A recipe for Panettone is a little bit different.
Kathy
10 December 2023 at 14:52Ok thanks I’ll try that, baking it now I’ll send u pics when done
Aleksandra
10 December 2023 at 15:37thank you!
Kathy
10 December 2023 at 21:42Another pic
Aleksandra
11 December 2023 at 14:58wow it looks really good! you can try to add more sugar to this recipe but more sugar (or more butter or eggs) – the dough will rise longer or you would need to add more yeast
Kathy
10 December 2023 at 21:40I took a chance and baked it as a panettone and it came out amazing BUT definitely needs more sugar!!
Aleksandra
11 December 2023 at 14:59thank you for the photos! what kind of baking pan have you used for these cute mini panettone?
Kathy
22 December 2023 at 14:41I bought mini panettone paper molds
Aleksandra
22 December 2023 at 14:48thank you!
Aleksandra
24 May 2018 at 19:16Danke Dir! Probier es auf jeden Fall, ist wirklich gut 🙂
Aleksandra
5 March 2018 at 10:26thank you Eva for your kind words!
Aleksandra
5 March 2018 at 10:25thank you! It really was fluffy!
Aleksandra
21 February 2018 at 16:25Thank you! It was a lot of fun, I can’t wait for the next #synchronbacken 🙂